Details
| Surface Treatment |
Anodized |
Material |
Aluminum Alloy 6005-T5 |
| Place of Origin |
China |
Installation Site |
Open Field |
| Brand Name |
Exten |
Model Number |
A02-1 |
| Standard |
|
Certificate |
AS/NZS1170.2/CE/ISO |
| Wind Load |
60m/s(196.85ft/s) |
Module Orientation |
Landscape Portrait |
| Wind speed |
Yo 60m/s |
Max Snow Load |
1.4KN/m2 |
| Snow Load |
1.4KN/m2(29.24psf) |
Service Life |
25YRS |
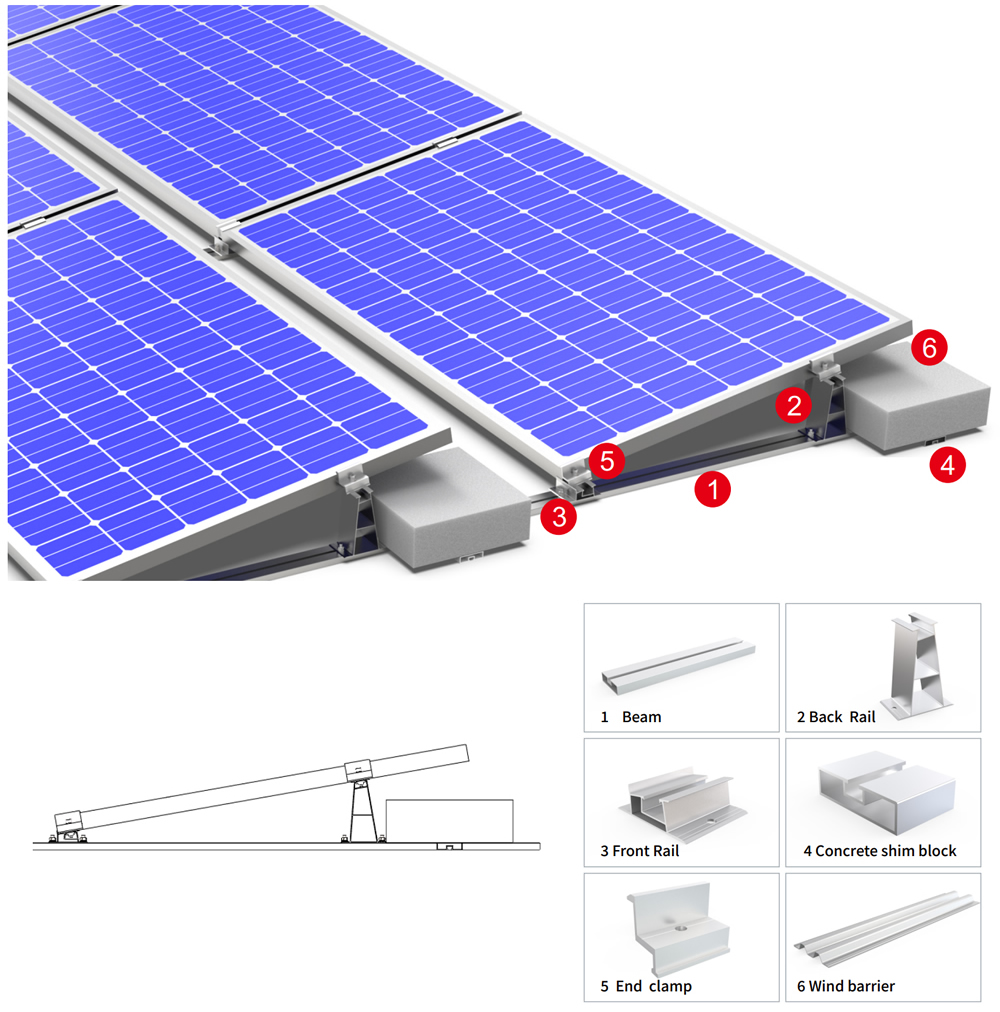
Component List
| Description |
Material |
Specificatioin |
Quantity |
| Beam01 |
AL 6005-T5 |
2900mm |
12 |
| Beam03 |
AL 6005-T5 |
700mm |
32 |
| Rack Rail |
AL 6005-T5 |
80mm |
12 |
| Front Rail |
AL 6005-T5 |
80mm |
12 |
| wind barrier |
AL 6005-T5 |
1640mm |
6 |
| Beam Splice |
AL 6005-T5 |
100mm |
12 |
| Mid Clamp |
AL 6005-T5 |
60mm |
12 |
| End Clamp |
AL 6005-T5 |
60mm |
12 |
Advantages
Flat roof solar mounting system are module mounting solutions specifically designed for flat-roofed buildings with a slope of less than 10 degrees. Since flat roofs lack a natural slope and must withstand environmental loads such as wind and snow, this system uses structural design to safely mount the modules on the roof at an optimal angle (typically 10 to 15 degrees).
The mainstream solution is the ballast-type mounting system, which utilizes the dead weight of concrete foundation blocks to resist wind loads. Since it does not require penetrating the roof, it fundamentally eliminates the risk of leaks and protects the building structure. Under specific conditions, alternative solutions such as chemical bonding or lightweight foundations may also be used.
The selection of this system is primarily based on three considerations:
First, safety—the non-penetrating installation ensures the long-term integrity of the roof and reduces maintenance costs.
Second, cost-effectiveness—the simplified installation process significantly reduces labor and time costs, making it particularly suitable for large-area commercial roofs.
Third, power generation efficiency—optimizing the tilt angle can increase solar irradiance by 10% to 20%, directly improving project returns. The system features a modular design, allowing for flexible and convenient future capacity expansion or relocation.
For commercial, industrial, and public building projects, solar panel flat roof mounting systems strike an excellent balance between safety, cost, and energy efficiency, making them a proven and preferred solution in the distributed PV sector.
Installation
The installation process for flat roof solar panel mounting can generally be divided into six distinct phases. The entire procedure is based on standardized operations, with the goal of efficiently and safely securing the modules to the roof while ensuring the long-term structural stability of the system.
1: Site Survey and Design Calculations. Engineers must take detailed measurements of the roof dimensions, confirm its orientation and identify surrounding obstructions, and perform load calculations based on wind and snow load data for the project location. Based on these results, the ballast distribution plan, mounting angle (typically 10 to 15 degrees), and array layout are determined. The quality of this work directly determines the system’s safety margin and power generation yield.
2: Material Delivery and Construction Preparation. Ballast base blocks, aluminum alloy rails, connectors, fasteners, and other materials are transported to the site according to the design bill of materials, sorted, stacked, and inventoried. Simultaneously, inspect the condition of the roof substrate to ensure the surface is clean and free of debris, providing a suitable working surface for subsequent positioning.
3: Foundation Positioning and Ballast Placement. Construction personnel accurately mark the array position lines on the roof according to the drawings, then place precast concrete blocks or metal ballast boxes one by one at the marked points. During this process, spacing and levelness must be strictly controlled, as this is the critical step for ensuring the precision of the superstructure. Because a ballast-based design is used, there is no need to penetrate the roof’s waterproofing layer at any stage.
4: Mounting Structure Assembly and Leveling. Secure the rails to the ballast foundations using specialized connectors, and calibrate each span with a level to ensure the entire support framework is flat and uniformly oriented. If necessary, use shims for fine-tuning to ensure the installation surface meets the design tilt requirements.
5: Flat roof solar racking Installation and Electrical Connections. Hoist the flat roof solar panel mounting kit onto the mounting structure one by one and secure them to the rails using clamps or fasteners. Then, complete the series connections between strings according to the wiring diagram, route the DC cables to the combiner box or inverter location, and install the grounding system simultaneously.
6: System Inspection and On-Site Testing. Verify the torque values of all fasteners, test the open-circuit voltage and polarity of each string, verify ground continuity, and finally clean up the work site and complete the acceptance record.
The entire process is interlinked, and the quality of work in each phase directly impacts the long-term reliability of the power plant.
Case
case
FAQ
Q1: What exactly is a flat-roof solar mounting system?
Simply put, it is a metal structure specifically designed to install solar panels on flat or low-slope roofs (with a slope of less than 10 degrees). Since flat roofs have no inherent angle and cannot allow the panels to face the sun directly, a mounting system is needed to elevate the panels and position them at an optimal tilt angle (typically 10 to 15 degrees). This system must support not only the weight of the modules themselves but also resist external loads such as wind and snow, transferring these forces to the building structure. Currently, the most common solution on the market is the ballast-type system, which uses the weight of concrete blocks to secure the system without drilling any holes in the roof.
Q2: How are ballast-type mounting systems secured? If they aren’t attached to the roof, won’t they be blown away by the wind?
This is a critical question. Ballast-type mounting systems do not penetrate the roof and rely entirely on their own weight to resist wind loads. Engineers precisely calculate the required ballast weight based on the basic wind pressure at the project site, the roof height, and the size of the panel array. Typically, precast concrete blocks or metal ballast boxes that can be filled with sand or gravel are used. The calculations account for the upward lifting force (uplift) and the lateral pushing force (overturning moment), with sufficient safety margins built in. As long as the design calculations are correct and the ballast is properly positioned during installation, the system will remain stable even under hurricane-force wind loads.
Q3: Will this installation method damage the roof’s waterproofing layer?
No. This is the most significant advantage of ballast-type mounting systems. Since the entire system does not penetrate the roof—involving no drilling, chemical anchors, or welding—it does not damage the roof’s waterproofing membrane or coating at all. For property owners, this means no need to worry about leaks at drill holes or incur additional costs for waterproofing repairs. If the roof needs to be replaced or the power plant relocated in the future, the entire mounting system can be removed by crane, restoring the roof to its original condition without leaving any permanent marks.
Q4: What are the general steps for installing flat-roof mounting systems? How long does it take to complete?
A standard installation project typically consists of six phases. First, site survey and load calculations to determine the design plan. Second, material delivery and construction preparation, including cleaning the roof. Third, precise positioning according to the drawings and placement of ballast foundation blocks. Fourth, assembly of the rail frame and horizontal alignment. Fifth, installation of photovoltaic modules and completion of electrical wiring and grounding. Sixth, system testing and final inspection. The total duration depends on the project scale; for a small commercial or industrial roof, the mounting system installation can typically be completed within a few days, while large-scale projects may take several weeks. Since it eliminates the need for drilling and waterproofing repairs, the ballast-mounted solution is much faster to install than the penetration-mounted method.
Q5: If more modules need to be added later, or if the system needs to be relocated, is it easy to adjust?
It’s very easy. Because the ballast-mounted mounting system features a modular design, all connectors are standard sizes, allowing for flexible additions or removals, much like building with blocks. If you need to expand the system, simply extend the rails and add ballast blocks and modules next to the existing array—no structural modifications are required. If you need to relocate the entire system to another building, you can disassemble it, transport it to the new site, and reassemble it; most materials and components can be reused. This reversibility and flexibility are among the key reasons why ballast-mounted systems are so popular in commercial and industrial distributed solar projects.


